
Saving your workbook is important if you want to use or view the file again at a later time. It’s also a good idea to get into the habit of regularly saving your workbook while you’re working on it and not just at the end before you close the file.
Saving A New Workbook The First Time
If you’ve created a new workbook and haven’t saved it yet, then you will notice at the top of the workbook Excel has named the file for you with its generic naming Book1, Book2, etc…
When saving a workbook for the first time you will need to use the Save As command to give the workbook a name and location to save it.
After using the Save As feature you will then be able to use the Save command to overwrite your previously saved file with the file in its current state.
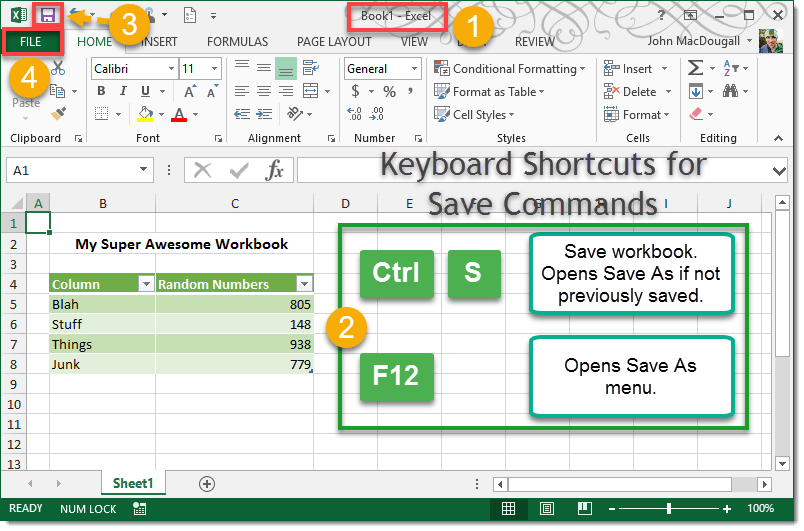
Saving your workbook with the Save or Save As commands.
- The name of your workbook appears at the top of the Excel window. If you haven’t saved the file yet Excel’s generic workbook name Book1, Book2, etc. will appear here.
- You can easily save a file at any time using the keyboard shortcuts.
- Ctrl + S will save the workbook using the previous name and location if your workbook has already been saved (i.e. it will overwrite the previous version). If your workbook has not been previously saved then this will open the Save As command for you to choose the name, file type, and location to save your workbook.
- F12 will open the Save As menu even if the file has previously been saved. This gives you the option of saving the file with a new name, in a new location, or with a new file type.
- You can also Save at any time using the Save icon in the Quick Access Toolbar. This has the same effect as the Ctrl + S shortcut mentioned above. The Save icon is in the QAT by default but you can also add a Save As icon into your QAT to quickly access the Save As menu.
- You can also access the Save and Save As commands using the File menu.
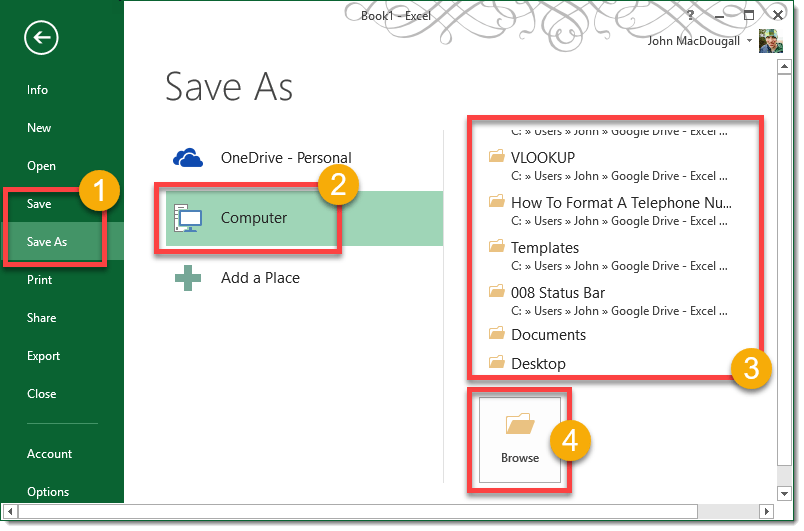
Saving your file with the File backroom menu.
- Select from either Save or Save As.
- Choose Computer to save the file locally on your computer.
- A list of recently used locations will appear to choose from.
- Browse your computer to choose a location to save to.
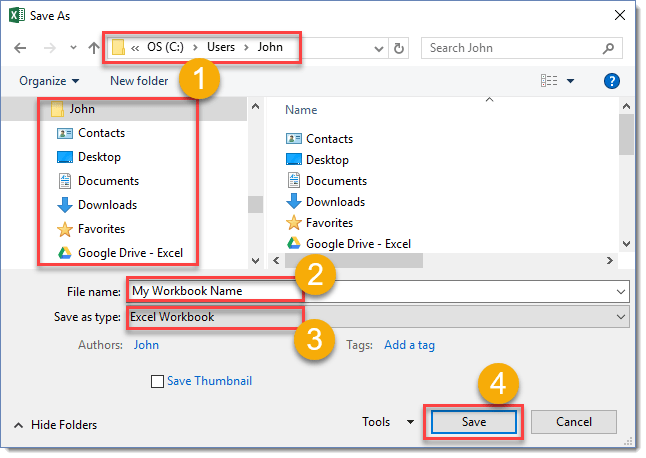
Using the Save As command will open a Save As window.
- Select the location to save your file either using the dropdown location menu or the selection pane on the left.
- Type a name for your workbook into the File name field.
- Select the file type from the Save as type drop-down list.
- Press the Save button.
Now that you’ve saved your workbook, you will see the new name at the top of the Excel window.
Saving A Previously Saved Workbook
It’s a good idea to save your workbooks at regular intervals while working on them so that if Excel or Windows crashes or the power goes out and you’re working on a desktop you don’t end up losing all your hard work.
Regularly pressing Ctrl + S or using the Save icon in the Quick Access Toolbar while you work on your file is easy to do and will potentially avoid headaches from lost work!
You can also still use the Save As command if your file has previously been saved to create different versions of your workbook (i.e. name your file My File v1.xlsx, My File v2.xlsx, My File v3.xlsx, etc… each time you save).
Using the Save command overwrites your file with the current version but if you use Save As command this will allow you to change the name and create a new file while leaving the last saved version of your file intact and will allow you to create a version history of your file.
Save Options Settings
In case you forget to save your files Excel has some auto recover feature that will potentially allow you to recover your lost work. It’s a good idea to adjust your save settings for this.
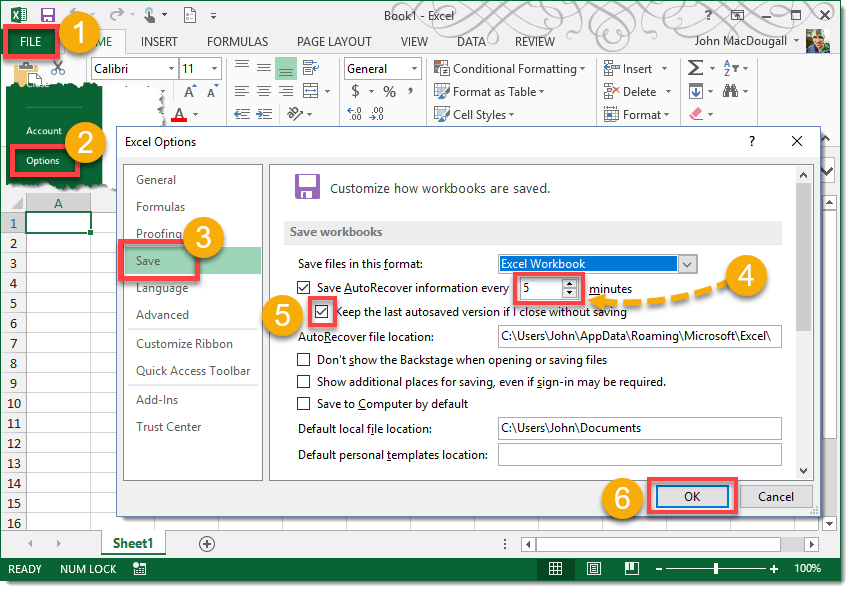
Adjust your save settings.
- Go to the File tab.
- Select Options from the menu.
- Go to Save in the Excel Options menu.
- Adjust the AutoRecover time to your preference. The shorter the time the more of your work you will recover in the event you forget to save. Keep in mind while working on a large file that recalculating before saving every minute can be inconvenient.
- Make sure Keep the last autosaved version if closed without saving is checked.
- Press the OK button.
Recover Your Unsaved File

In the event you forget to save your file before closing you can try and recover your file.
- Go to the File tab in the ribbon.
- Select Open from the menu.
- Select Recent Workbooks.
- Scroll down the list of recent workbooks to the bottom and click on the Recover Unsaved Workbooks button.
- Select your file from the menu.
- Press the Open button.
Conclusions
These handy tips for saving your Excel files should help make it an easier process.
Remember to save often!
Let me know in the comments if you have any other tips for saving files!


![6 Ways to Count Colored Cells in Microsoft Excel [Illustrated Guide]](http://cdn-5a6cb102f911c811e474f1cd.closte.com/wp-content/uploads/2021/08/Count-Coloured-Cells-in-Excel.png)


0 Comments