It’s a task I’ve had to do before. Get a list of all the sheet names in a workbook with 100+ sheets in it.
With a bit of VBA know-how, it can be done fairly quickly. Writing the code to loop through all the sheet objects in the active workbook and write them out to a sheet would only take a dozen lines of code.
What if you needed to this for all workbooks in a given folder? Hmm, a bit more code and it’s possible. You first need to loop through all the workbooks in a folder, then for each one loop through all the sheets and write the names out to a workbook. Ok, it’s getting a bit more complicated and there’s a bit more code involved.
Ok, now what if you want to do this for the folder and all subfolders that it contains? You’d have to write code to check if a folder has any subfolders, then loop through them and check each one of those to see if they themselves have any subfolders… and so on, and on until you don’t find any more subfolders. At each folder level, you also need to loop through all the files and get sheet names too.
Who wants to spend their time writing code? I don’t. That’s what makes power query so awesome. Many things that used to require coding in VBA to do, can now be done quickly without a bit of coding.
The Setup
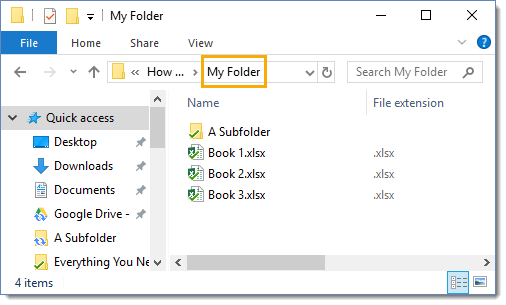
I’ve set up a folder called My Folder containing 3 Excel workbooks and one folder called A Subfolder (bravo John, very original name). Each workbook has a couple of sheets in them but is otherwise empty.
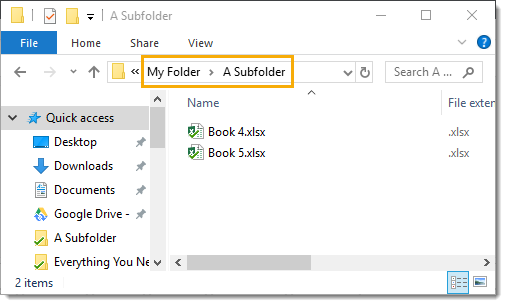
In the subfolder, I have a few more workbooks which are again empty apart from a couple of sheets.
Let’s see if we can get all the sheet names using Power Query.
Create a From Folder Query
First, we need to create a new From Folder query that targets our main folder.
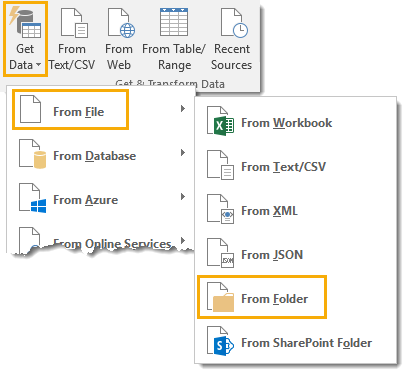
Go to the Data tab and press the Get Data button in the Get & Transform Data section. Then select From File and choose From Folder.
This will create a new query and you’ll be prompted to input the folder path of the main folder or you can browse to its location.
Next, a preview of the data will show up and you should see a list of file names along with other data about the files like extensions, dates, and paths. Press the Edit button to further edit these results.
Filter on Excel Files
It might be the case that some of the folders you have might contain different file types other than Excel files. Maybe you have some Word documents, pictures or powerpoint files in the folder or some of its subfolders. So we will need to first filter our query to only show us the Excel files in our folders.
In my case, I only have xlxs files in the folders so it’s not a vital step to get the query working now. It’s a good idea to add the filter in though, as this will prevent the query from breaking down the road if other types of files get added into the folder later.
It’s possible that an extension on a file appears all lower case or all upper case. We could have a .xlsx or .XLSX file extension, so we’ll need to incorporate this possibility into our filter since power query is case sensitive.
We may also want to allow for other Excel file extensions like .xls, .xlsm or .xlsb and their upper case versions as well.
To take care of extensions possibly being of lower or upper case, we will first transform them all into upper case. This way we will only have to account for the uppercase version in our filters. This will save a couple OR conditions in our filter step.
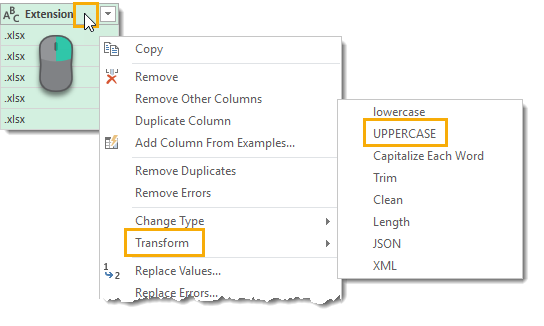
Right click on the Extension column heading in the data preview and select Transform and then UPPERCASE.
You can also access this from the Transform tab in the ribbon under the Format command found in the Text Column section.
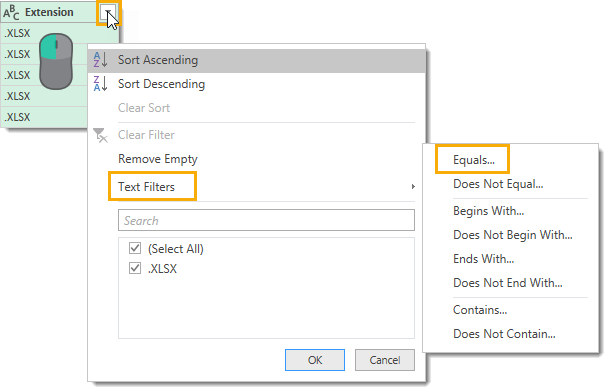
Now we can filter on the Extension column to make sure it only contains Excel workbooks. There’s only one item in the filter selection box now, so we’ll need to use the text filters to account for other options. Left click on the filter icon on the left hand side of the column heading and select Text Filters then choose the Equals option.
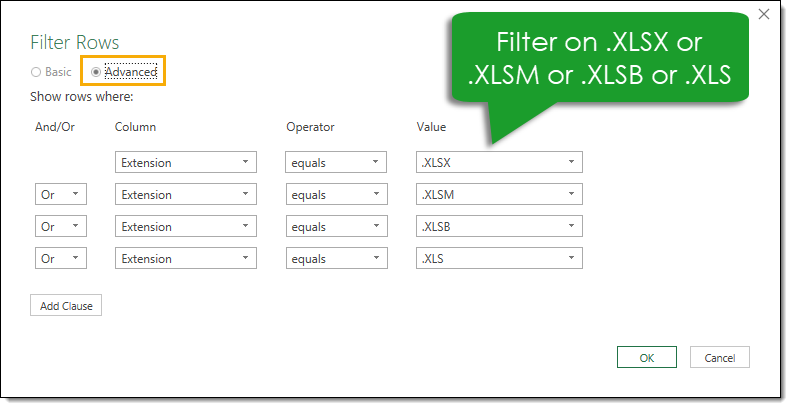
Navigate to the Advanced filter options and enter all the conditions. We’ll need to filter based on .XLSX or .XLSM or .XLSB or .XLS. Note that we need to include the period before the extension as this is included in the Extension field in our query results.
Now we have only the Excel files from our folders. If some other type of files gets added to the folders later, our query will filter them out and the query won’t fail with an error.
Remove All Columns Not Needed
There’s a lot of columns of data in here that we won’t be using and are just cluttering things up. We will only really be using the Name and Folder Path columns going forward, so we can remove the rest.
Select both the Name and Folder Path columns. This can be done by clicking on the first one then holding the Ctrl key and clicking on the second one. Now right click on the column heading and choose Remove Other Columns.
Add a Custom Column
Now that we have the path and file name of all the Excel workbooks in our folders and subfolders, we can use the Excel.Workbook function to get the sheet names from all these files. We’ll add in a custom column to use this function.
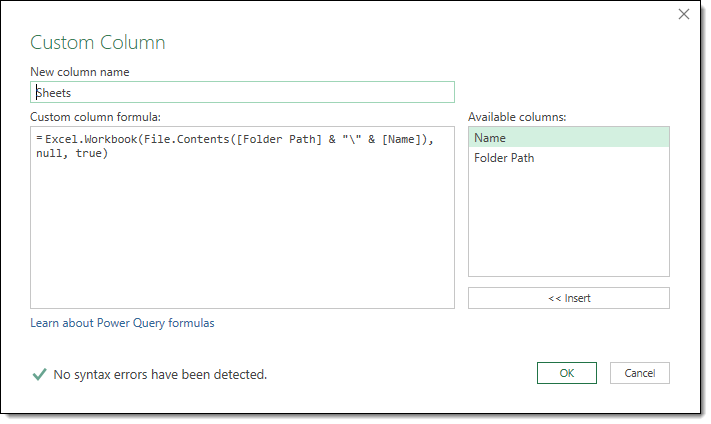
Go to the Add Column tab in the query editor ribbon and select Custom Column from the General section.
Now we can enter this formula and name the new column Sheets.
In this formula, we concatenate the file path with the file name to get the full address of the file. The File.Contents function will take this full address and return the binary contents of the file. The Excel.Workbook function then takes this content and returns a table representing the sheets in the given workbook.
Expand the Sheets Column
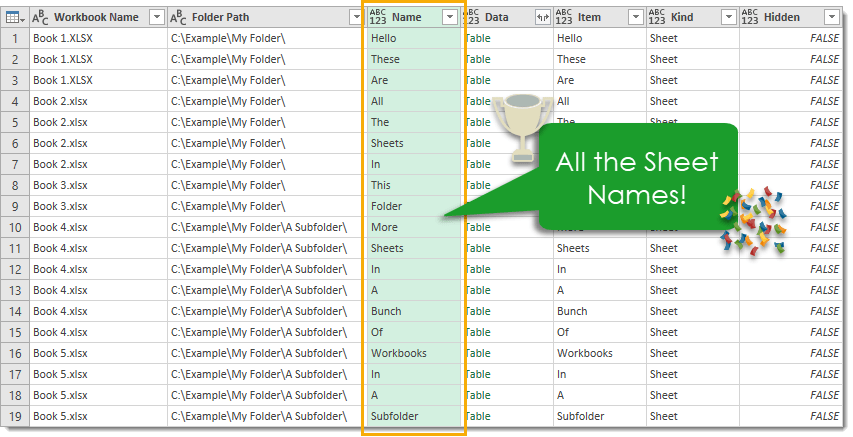
Now we have a column that contains a table for each row. The table in each row contains the sheets for the file listed in the row and we need to expand the tables to see all the sheet names.
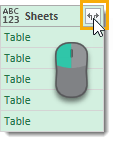
Left click on the expand icon in the Sheets column and then choose Expand and press the OK button. We can also uncheck the Use original column name as prefix box here.
We now have all the sheet names.
Filter on the Sheet Kind
In our case, we only have Sheet in the Kind column because I was lazy and created workbooks that were empty apart from a couple sheets. It’s likely that your workbooks will have a lot of other things in them, so we’ll need to filter on this column to only keep sheets.
Create a Text Filter on the Kind column using the Equals option and filter on Sheet.
Close and Load the Query
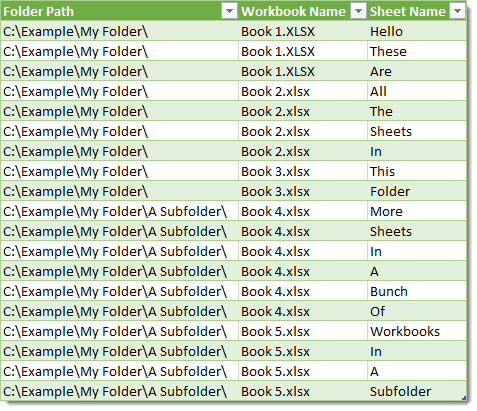
Before we close and load this into a table, I’m going to remove a couple of the columns I don’t need, and rename a few others and reorder them. Now it’s ready to close and load this query and we have the folder path, workbook name and all their sheet names from all the folders and subfolders. Wow, that’s awesome!
Conclusions
There are a lot of steps in the process, but once you start to become familiar with power query, most of them will become second nature. The hardest part of the process was writing a custom column formula with two power query functions. But I’d way rather do that than try and write some VBA that loops through all the folders and grabs the sheet names.
We were even able to keep track of which sheets were in which files and which folders. That would add another layer of things you needed to program into any VBA solution, and who need more work? That extra information just naturally came with the power query solution.


 👉 Find out more about our Advanced Formulas course!


Thanks, John for the great post. I was trying to get the sheet names the other day and used a vba function of defining a list and indirect equation. Quite messy! This is a clean and easy method. Thanks for sharing.
No problem Bradley.
You can also check out my post on listing sheets with VBA.
Great post, thank you! Do you know if there is a way to document column names as well? I can use DAX studio but it would be useful to be able to do this using Power Query only. Thanks again, R
I get to the point of editing the query results from the Create a From Folder Query steps, but I don’t see an Edit Button anywhere. What am I missing?
They changed some of the naming since I wrote this. You probably see transform now? This is the new edit button.
Excellent! Still accurate and relevant after 3 years of Excel updates and changes by Microsoft. One UI change did require some guesswork–after getting the preview of files being processed, getting to the PowerQuery screen to add the custom column required clicking a button that seemed like it might be a point of no return.
Although your instructions were almost perfect, I’m now running into an issue that I wonder if you can help me troubleshoot. When attempting to Save and Load, I see it counting the many files and then going through each file to get the tabs; in the end it returns an error message “Download did not complete: [DataFormat.Error] File contains corrupted data.” Unfortunately, it doesn’t give me any indication of which file created the error. Any ideas how I might troubleshoot this?
[Update] I was able to find the workbook causing the error by running the query on a folder-by-folder basis; once the tab count got small enough to fit into the preview window, it told me the error in the preview line. Looking at the folder where the last file processed occurred, there was a hidden temporary file with the xlsm extension, so it returned bogus. I added a filter on the filename to omit anything starting with a ‘~’ character.