Do you need to add a new sheet tab to your Excel workbook? This post is going to show you all the ways that you can insert a new sheet in Excel!
Excel allows you to add multiple sheets within a workbook. This is a great way to organize your spreadsheet solutions as you can separate your inputs, data, calculations, reports, and visuals into different sheets.
Organizing your workbooks with sheets can also make the spreadsheet easier to navigate for any user.
How can you add new sheets to an Excel workbook? Follow this post to find out all the ways to add sheet tabs in Excel. You’ll even learn how to add multiple sheets based on a list!
Add a New Sheet with the New Sheet Button
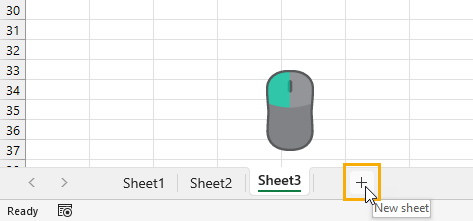
The quickest and easiest way to insert a new sheet in Excel is using the New Sheet button located to the right of the current sheet tabs.
Left click on the plus sign icon to the right of the sheet tabs and Excel will create a new blank sheet in your workbook!
Add a New Sheet from the Home Tab
Adding a new sheet can also be done from the Excel ribbon.
You might think this action would be located in the Insert tab, but it will actually be found in the Home tab.

Follow these steps to insert a new sheet from the Home tab.
- Go to the Home tab.

- Click on the lower part of the Insert command found in the Cells section.
- Choose the Insert Sheet option from the menu.
This will create a new sheet in your workbook.
Add a New Sheet with a Keyboard Shortcut
Good news for anyone who prefers to navigate Excel with their keyboard as much as possible! There is a dedicated keyboard shortcut for adding a new sheet.
Press Shift + F11 on your keyboard to insert a new sheet.
Add a New Sheet with Excel Options
When you create a new Excel workbook, the number of sheets it comes with will be determined by your Excel Options settings.
You can change this default so that any time you create a new workbook, it will have your desired number of blank sheets available.
The Excel Options menu allows you to customize your Excel experience with various app and workbook settings.

Follow these steps to adjust the default number of sheets in a workbook.
- Go to the File tab.
- Select Excel Options in the lower left.
- Go to the General section of the Excel Options menu.
- Scroll down to the When creating new workbooks section.
- Change the number in the Including this many sheets input.
- Press the OK button.
The next time you create a new Excel workbook, it will have your desired number of blank sheets.
💡 Tip: You can test out this new setting by pressing Ctrl + N to create a new workbook.
Add Multiple New Sheets with a Pivot Table
Did you know you can create multiple sheets from a list in the grid by using a pivot table?
This is a hidden gem for when you need to quickly create many sheets.
For example, suppose you need to create new sheets for each US state or each product that your company sells. This would be a tedious process with the previous methods.
If you have these sheet names as a list inside the grid, then you can create a pivot table based on this list and use the Show Report Filter Pages feature to generate the sheets for you.

This example shows a list of US states which can then be used to generate sheets with those US state names.
Follow these steps to automatically generate sheets from a list using a pivot table.
- Create a pivot table based on your list.
💡 Tip: Check out this post to see how to insert a pivot table from your list.

- Click and drag the sheet name field to the Filters area in the PivotTable Fields menu.

- Go to the PivotTable Analyze tab.
- Click on the Chevron icon in the Options command.
- Choose the Show Report Filter Page option from the menu.

This will open the Show Report Filter Pages menu.
- Select the field with your sheet names.
- Press the OK button.
You will only see multiple field choices in the menu if you have added multiple fields to the Filters area of your pivot table.

This will create a new sheet for each unique item in your list, and each sheet will be named based on the text in your list.

Each sheet will contain a filtered version of your pivot table in cell A1. The pivot table will be filtered on the same item as the sheet name.
Add Multiple New Sheets with VBA
VBA is a great way to automate any task for Excel in the desktop app. This includes adding sheets!
You can create a VBA macro that will create new sheets based on a selected list.
Go to the Developer tab and select the Visual Basic command or press Alt + F11 to open the visual basic editor.
📝 Note: You might need to enable the Developer tab first as it is disabled by default.

Go to the Insert menu in the visual basic editor and select the Module option from the menu.

Sub AddSheets()
Dim myRange As Range
Dim sheetTest As Boolean
Set myRange = Selection

For Each c In myRange.Cells
sheetTest = False
    For Each ws In ThisWorkbook.Worksheets
        If ws.Name = c.Value Or c.Value = "" Then
            sheetTest = True
        End If
    Next ws
    If Not (sheetTest) Then
          Sheets.Add.Name = c.Value
    End If
Next c
End Sub
Paste the above code into the new module.
This code will loop through the selected range in your workbook and will create a new sheet for each cell. If the sheet name already exists, then this item will be skipped.
Now you will be able to select any range in your workbook and run the VBA code to automatically create multiple sheets.
Add Multiple New Sheets with Office Scripts
Another way you can automate the creation of your sheets is by using Office Scripts.
Office Scripts is the JavaScript language for automating tasks in Excel online. You will need to be using Excel on the web with a business Microsoft 365 account as this feature isn’t available otherwise.

Open Excel online and go to the Automate tab and select the New Script option. This will open the Office Script editor on the right side.

function main(workbook: ExcelScript.Workbook) {

	//Create an array with the values in the selected range
	let selectedRange = workbook.getSelectedRange();
	let selectedValues = selectedRange.getValues();
	//Get dimensions of selected range
	let rowHeight = selectedRange.getRowCount();
	let colWidth = selectedRange.getColumnCount();

	//Loop through each item in the selected range
	for (let i = 0; i < rowHeight; i++) {
		for (let j = 0; j < colWidth; j++) {
			try {
				workbook.addWorksheet(selectedValues[i][j]);
			}
			catch (e) {
				//do nothing
			};
		};
	};
};
Add the above code to the editor and press the Save script button.
This code will loop through the selected range on your sheet and create a new sheet for each item in the range.
Now you select a range in your sheet and press the Run button in the Code Editor. This will run the code and create the required sheets in your workbook!
Add Multiple New Sheets with Power Automate
Microsoft Power Automate is a cloud-based service that makes it easy for end users to create and run automated workflows.
Users can build workflows in a matter of minutes, without any need for coding or complex configuration with the intuitive user interface.
The service can be used to automate a wide range of tasks, including sending emails, copying files, and creating records in databases.
Power Automate is part of the Microsoft Power Platform, which also includes Power BI and Power Apps. Together, these products provide a powerful end-to-end solution for business process automation.
But the best part is it’s available for use as part of any Microsoft 365 subscription!

You can use Power Automate to create sheets from a list inside an Excel Table. In this example, the desired sheet names are in an Excel Table with a column named Names.
📝 Note: This Excel file will need to be saved in either SharePoint or OneDrive in order to work with Power Automate.

Go to the Power Automate Portal and log in with your Microsoft credentials.
Then go to the Create tab and select an Instant cloud flow. This will allow you to run the flow manually with a button in the Power Automate portal.

Give your Flow a name then select the Manually trigger a flow option and then press the Create button.

This will open the flow builder and you can add steps to your workflow.
- Add a List rows present in a table step and then select the relevant file and table location in the various fields.
This action will read all the items in your table of sheet names. This will be used in the next step to create and name new worksheets.
- Add a Create worksheet step and select the same file.
- Select the Names field from the previous List rows present in a table action.
When you add the Names field to the Name input in the Create worksheet step, it will automatically add this step into an Apply to each action. This way a worksheet will be created for each item in your list of sheet names.
Press the Save button to save your flow and it will be ready to run!

Go to the My flows menu, select the Cloud flows tab, and then press the Run button for your flow.
You don’t even have to have the file open, and the sheets will be added to your workbook!
Conclusions
Most of your workbooks will need more than one sheet, so learning how to add sheets in Excel is essential.
There are manual ways to create new sheets such as the New Sheet button, the Home tab, and a keyboard shortcut. There are all great methods when you only need to add a few sheets.
There are also several methods for adding sheets in an automated manner based on a list! VBA, Office Scripts, Power Automate, and even pivot tables can all be used for situations where you need to add a lot of sheets.
Which method do you prefer for adding sheets to your workbooks? Do you have any other tips for this? Let me know in the comments section below!


 👉 Find out more about our Advanced Formulas course!


0 Comments