Do you need to solve mathematical problems related to linear programming, non-linear programming, and optimization? You must learn how to use Solver in Excel.
Navigating the intricate terrain of data analysis is made easy by various Excel tools, and among them, Solver stands out the most. It helps you with what-if analysis where you can input objectives, constraints, and a resolution model so Excel can perform the heavy weight lifting for you.
Knowing how to wield Solver effectively can be a game-changer in the data analysis and data science field. Whether you’re an analyst, a student, or a professional, understanding its mechanics empowers you to tackle complex optimization problems.
Read this article until the end to learn the basics of Solver in Excel, its user interface, algorithms, and a real-world scenario where you can use it effectively.
What Is The Excel Solver Add-In?
The Excel Solver add-in is a what-if analysis tool for tackling optimization problems within spreadsheets. Serving as a mathematical engine, it aims to find the optimal solution for a given set of constraints, for example, finding the maximums or minimus.
By adjusting selected variables, Solver maximizes or minimizes a target cell, adhering to defined limitations. This dynamic functionality proves invaluable in scenarios like resource allocation, financial planning, and scheduling.
With its ability to handle complex calculations, Excel Solver empowers you to make informed decisions based on quantitative analysis.
Microsoft has been including Solver in Excel since Excel 2007. This is a free data analytics tool that doesn’t require any complex setup process. However, the tool has a steep learning curve.
You must create a viable data model where you can apply the mathematical and statistical analysis capabilities of the Solver tool.
Reasons to Use Solver in Excel
Here’s why you might want to use Solver in Excel:
- Solver helps find the best possible outcome by maximizing or minimizing a target while adhering to given constraints.
- It tackles intricate mathematical problems involving multiple variables and constraints that are challenging to solve manually.
- It’s useful for distributing resources effectively, whether in financial planning, project management, or inventory control.
- Solver in Excel enables making informed decisions backed by quantitative analysis and mathematical models.
- Excel Solver also allows testing various scenarios by changing variables and observing their impact on outcomes.
- The Excel Solver tool automates finding optimal solutions, saving considerable time and effort.
- It also reduces human error in complex calculations, ensuring precise results.
Know the Solver Add-In User Interface
The above shows a typical Solver user interface on Excel for the Microsoft 365 desktop app.
You only need to interact with the following UI elements to solve standard optimization problems:
Set Objectives

Here you choose a calculated cell on the Excel worksheet. You can choose the objective to Max, Min, or a custom goal you want to achieve by typing a numeric figure into the Value Of field.
For example, you want to earn $2,000 a month by offering remote and freelance services as shown in the above example.
By Changing Variable Cells

You must also indicate the cells or cell ranges Excel can manipulate to achieve the goal you’ve set above. These cell ranges could be calculated cells or fixed value cells.
In the previous example, the payout per project is fixed. So, I need to take up more projects to achieve the target revenue of $2,000. So, I entered the valid ranges under column B, like B2:B5 as the variable cells.
Subject to the Constraints
These are the restrictions or regulations you must follow in your project and then you want to reach an optimized value.

In the previous example, the following are the constraints I must adhere to:
- Writing maximum (
B2) 10 projects - Graphic designing maximum (
B3) 8 projects - Web publishing (
B4) Unlimited projects - Editing maximum (
B5) 100 projects - Payouts (
C2:C5) fixed, hence not entered in the model
Accordingly, I entered the constraints in the respective field marked with a box. You can click Add to include a new constraint to the model. Also, select an existing constraint and click Change to modify the logic. Finally, select a constraint and hit the Delete button to get rid of the constraint.
Load/Save
Load/Save button allows you to use a previously configured Solver model or save the current solver model. You mainly save or load the constraints that you’ve created in the model.

To load, click Load/Save and then highlight a cell range that contains any previously saved Excel Solver model.

To save one, click Load/Save. Then, highlight a blank cell range containing a minimum number of rows indicated on the Load/Save Model dialog box.
This Solver element helps you to try multiple sets of constraints and models to choose the best one.
Select a Solving Method

The Excel Solver add-in allows you to choose from three different algorithms and these are as outlined below:
GRG Nonlinear
The abbreviation GRG stands for Generalized Reduced Gradient Nonlinear. This is an optimization technique designed for addressing nonlinear problems. These can encompass multiple feasible regions or exhibit sets of analogous values within variable cells, all while upholding constraint fulfillment.
Simplex LP
The Simplex LP algorithm, utilized in Solver, is an optimization technique to solve linear programming problems. It iteratively moves along the edges of a feasible region to maximize/minimize a linear objective function.
While efficient in many cases, it might struggle with highly complex problems or degenerate situations. You must only choose this algorithm if you’re certain that the optimization problem is of the linear kind.
Evolutionary
The Evolutionary algorithm in Solver emulates natural selection to optimize complex problems. It generates a population of potential solutions, applies mutation and crossover operations, and evaluates fitness. Over generations, fitter solutions survive and produce improved offspring, converging towards optimal or near-optimal solutions, suitable for various challenging optimization scenarios.
Solver Results

The Solver Results dialog box allows you to do the following:
- Replace the existing dataset with the ones generated by Solver. Select the Keep Solver Solution option and click OK.
- If you need to generate detailed reports, choose the options under the Reports menu on the right and click OK.
- Click Save Scenario to save the Solver result by giving it a scenario name.
How to Add Solver on Excel for Microsoft 365 Desktop App
Adding Solver to Excel on a Windows PC is a straightforward process. You can find detailed step-by-step instructions in this excellent coverage of Solver in Excel:
2 Ways to Install Solver in Microsoft Excel
Does Solver Work on Excel for the Web?
If you need to explore optimal solutions for non-linear and linear programming and mathematical optimization problems on Excel for the web, unfortunately, it won’t work there. At the time of writing, Excel for the Web doesn’t support any Excel add-ins. So, Solver won’t work there.
How to Install Solver Add-In on Excel for Mac
The Excel Solver add-in is also compatible with various Excel for Mac editions like the following:
- Excel for Microsoft 365 for Mac
- Excel 2021 for Mac
- Excel 2019 for Mac
- Excel 2016 for Mac
- Excel for Mac 2011
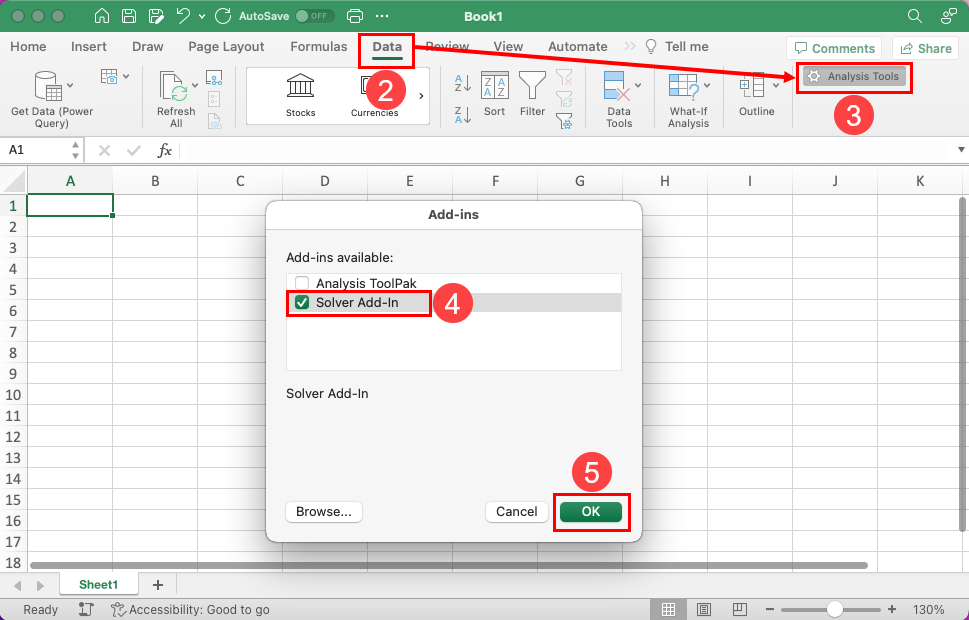
If you’re using any of the above-mentioned Excel apps on your Macbook or iMac, follow these steps to enable the Solver tool on Excel:
- Open Excel for Mac app from Dock or Spotlight.
- Go to the Data tab on the ribbon menu.
- Click the Analysis Tools button.
- Checkmark the Solver Add-in inside the Add-ins available menu.
- Click OK to save the changes you’ve made.

The Solver tool will appear as a clickable button below the Analysis Tools button on the Data tab as shown in the above image.

If you don’t see the Analysis Tools button on the Data tab, click the Excel menu on the Mac toolbar. There, go to the System Settings or Preferences menu.

Click the View menu inside the Authoring section and checkmark the Developer tab under the In Ribbon, Show section.
How to Use Solver in Excel
Find below a real-life dataset and scenario where you can use Solver to maximize income.
Achieving an Income Goal
This Solver scenario will instruct how many projects you need to take up to achieve your weekly or monthly income goals.

Find above the current projects, project niches, payouts, and total earnings.

You also need to follow the above constraints when accepting projects from your clients.

Now, follow these steps to put the above dataset into Solver and find out an optimum strategy to increase the income to $2,000:
- The final earning target, which is
D6, should be a formula. For example, I used the following:
=SUM(D2:D5)- Now, click the Data tab and select the Solver add-in at the far right of the ribbon.
- The Excel Solver interface should show up.

Now, you must configure the Solver model by following these steps:
- On the Solver Parameters dialog box, click the Set Objectives field and enter
$D$6. That’s the objective of the model. - Select the Value Of selection and enter the objective income, which is $2,000.
- Click the By Changing Variable Cells field and highlight the cell range on the worksheet. For example,
$B$2:$B$5. - If you want to include more than one variable cell range, put an Excel separator or comma and then select the next cell range on your worksheet.
Here’s how you can input the constraints into the model:

- Into the Subject to the Constraints field, you must enter various restrictions that you must follow to achieve the objective.
- To add a new constraint, click the Add button.

- On the Add Constraints dialog, select a cell reference, set a logical operator in the middle, and enter the constraint value in negative or positive numerical.
- Click OK to save it.

Now, time to calculate the number of projects you must take up to attain the goal. Here’s how it’s done:
- Set GRG Nonlinear as the default solving algorithm. You can change this to alternative options if you’re sure those algorithms will generate a better result.
- Click the Solve button.

- If the result page shows the “Solver found an integer solution…” message, click OK to enter the values into your dataset.

The image above shows the optimization you must implement to achieve the set income goal.
Conclusions
So, now you know how to use the Excel Solver add-in. Follow along with the instructions outlined in this Excel tutorial to use this powerful optimization tool of Excel.
Don’t forget to comment below about your experience while using the Excel Solver tool. If you discovered any Solver tricks not mentioned above, do write them down in your comment.


 👉 Find out more about our Advanced Formulas course!


0 Comments