Excel and PDF are two very popular file types.
There’s a good chance you’ve probably needed to convert your Excel file into a PDF.
In this post, I’ll show you 5 ways you can easily convert your Excel file into a PDF.
Video Tutorial
Save as PDF
This is the most commonly used method and you might have already used this once or twice already.

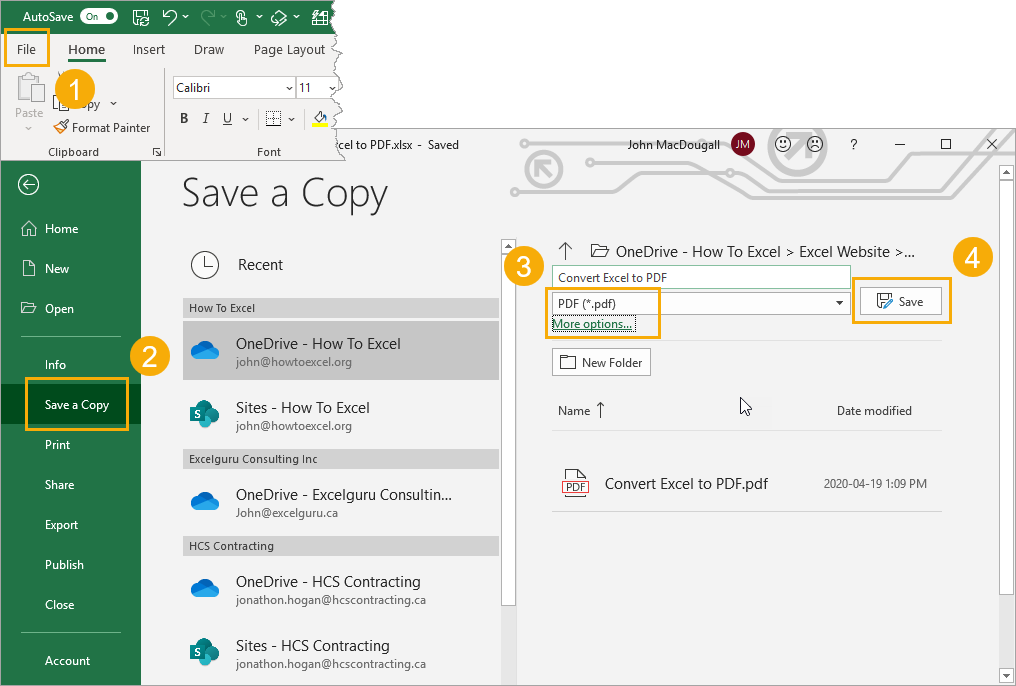
Save a copy of the file as PDF.
- Go to the File tab.
- Go to the Save a Copy tab.
- Select PDF as the file type.
- Press the Save button.
Easy enough, and your new PDF file will be saved in the same location as the Excel file is saved.

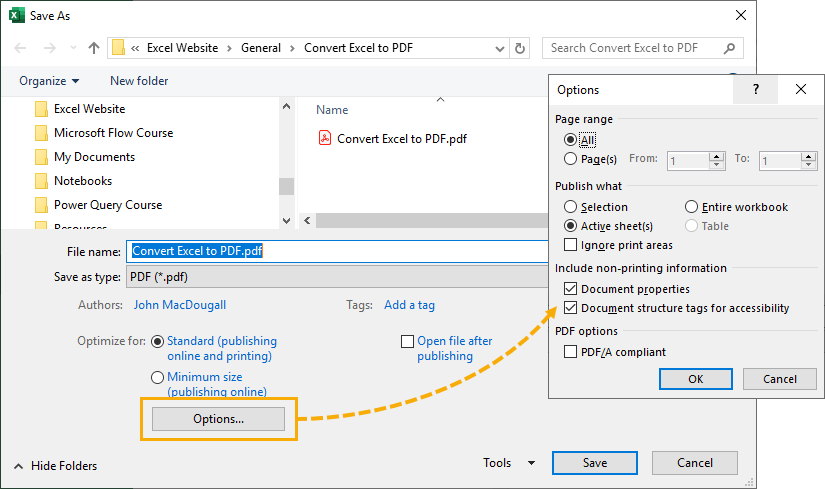
If you want to change the save location or access other advanced PDF file options then you can click on the More options link just below the file type selection.
This will open up a the Save As menu and you can navigate to a new save location as well as access the advanced Options for PDF files.
Export as PDF
I never really noticed this, but there’s an Export option in the File menu.
It turns out, you can use this to export your file as a PDF!

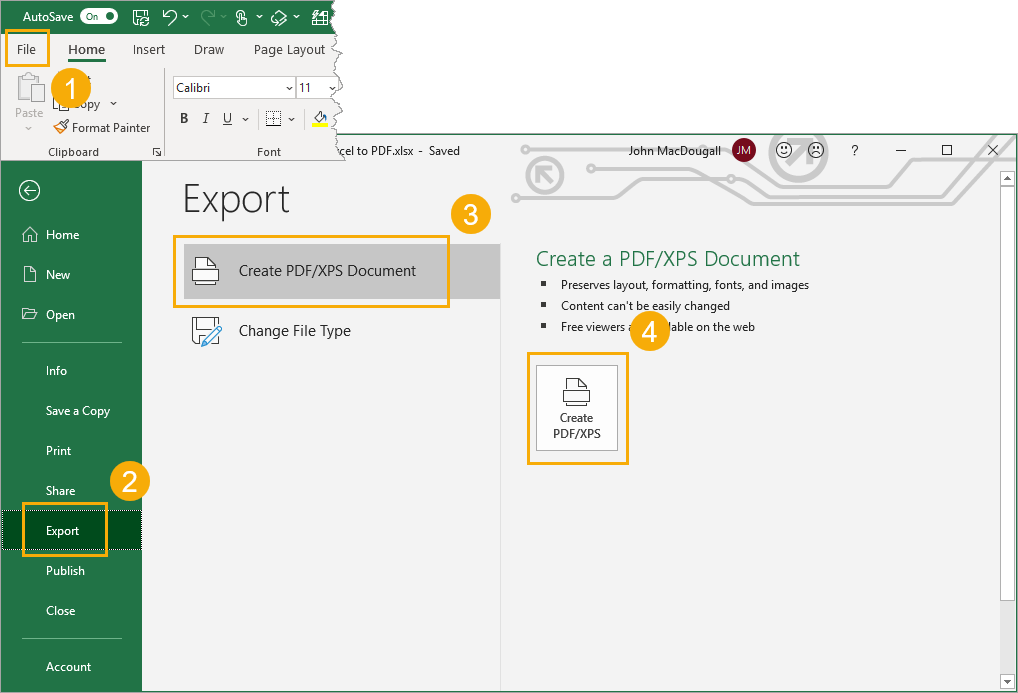
To Export your Excel file as a PDF.
- Go to the File tab.
- Go to the Export tab.
- Select Create PDF/XPS Document.
- Press the Create PDF/XPS button.

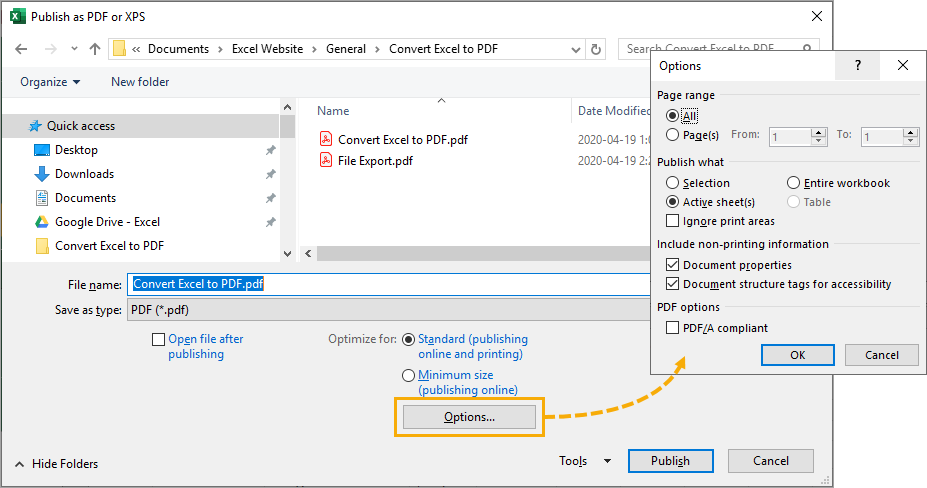
This will open up the Publish as PDF or XPS menu, which is exactly like the Save As menu and you can choose the location to publish as well as access advanced PDF Options.
Publish as PDF Quick Access Toolbar Command
You can add the publish as PDF command to the quick access toolbar to avoid the step of going to the File tab.

Right click anywhere on the quick access toolbar and choose Customize Quick Access Toolbar from the menu.

This will open up the Excel Options menu and you can add the Publish as PDF or XPS command from here.
- Make sure you’re on the Quick Access Toolbar tab in the Options menu.
- Select All Commands.
- Scroll down and select Publish as PDF or XPS.
- Press the Add button to add the command into your selection of Quick Access Toolbar commands.
- Press the OK button.

You can now use this command from the Quick Access Toolbar to publish your Excel file as a PDF document.
Email as PDF Attachment Quick Access Toolbar Command
This is one of my favourites on the list as it does two things for you. It will convert your Excel file to PDF and then create a new email message with the PDF attached.
All without any code needed!
This is super useful if you need to email your files as PDF’s.

Again, right click on the quick access toolbar and choose Customize Quick Access Toolbar from the menu.

In the Excel Options menu and you can add the E-mail as PDF Attachment command.
- Make sure you’re on the Quick Access Toolbar tab in the Options menu.
- Select All Commands.
- Scroll down and select E-mail as PDF Attachment.
- Press the Add button to add the command into your selection of Quick Access Toolbar commands.
- Press the OK button.

This will place the E-mail as PDF Attachment command into your quick access toolbar.

When you press this command, it will automatically create a new Outlook email with a subject line of the Excel workbook name. The PDF of the converted Excel file will also be added as an attachment.
This will save you many clicks.
Convert File to PDF in Power Automate
All the previous options to convert your Excel file to PDF are great and they will save you valuable clicks, but they are not automated.
There is a Power Automate action that can convert files to PDF. This means you can convert PDF files as part of some automated process.
You could use this to do things like automatically create and send PDF invoices by email at the end of the month.
The file you want to convert will need to be saved in OneDrive.

You’re going to need to add two actions to your automation. The first to convert the file and the second to create the file.
- Add a Convert file action from the OneDrive connector.
- Select the file you want to convert.
- Select PDF as the Target type for the conversion.
- Add a Create file action from the OneDrive connector.
- Select the folder where you want to create the PDF.
- Give your PDF file a name. Make sure to end the name with the .pdf extention.
- Press the dynamic content button and add dynamic content for the File content using the content created from the Convert file OneDrive action.
Conclusions
Converting your Excel files to PDF is a common task.
Luckily it’s pretty easy and there are a few options available.
There is also a Power Automate option for converting Excel to PDF which means you can create automated processes that convert your files to PDF.
Which one is your favourite? Let me know in the comments!
 👉 Find out more about our Advanced Formulas course!

![6 Ways to Count Colored Cells in Microsoft Excel [Illustrated Guide]](http://cdn-5a6cb102f911c811e474f1cd.closte.com/wp-content/uploads/2021/08/Count-Coloured-Cells-in-Excel.png)


0 Comments