Want to learn how to unprotect Excel sheets? Read this Microsoft Excel tutorial until the end to master this must-have Excel skill.
You can protect an Excel worksheet using a password or without one. This feature enables you to restrict someone else from accessing confidential data other than the intended recipient. It works like a tool of accountability. You know whom to contact if a third party accessed your Excel worksheet using a password you only shared with a colleague or employee.
Now, you might want to unprotect such locked Excel worksheets to allow public access. Or, you want to change the password because you suspect it’s no longer a secret. If you know the old password, it’s a cakewalk. What if you’ve forgotten the current password?
Read this article and follow along with the methods to learn various methods to unlock Excel sheets.
⚠️ Warning: This article is only for educational purposes. Try the tricks only on workbooks and worksheets created by you. Don’t misuse the Excel knowledge shared to violate someone else’s intellectual property rights.
Unprotect Excel Sheet With a Password
Suppose, your supervisor has emailed you a confidential inventory database in an Excel workbook to review and make changes. The password to unlock the file is also in the email. But, you’ve never used this Excel functionality before. Find below all the methods you can follow:
📒 Read More: Lock a Sheet in Microsoft Excel
From the Info Menu
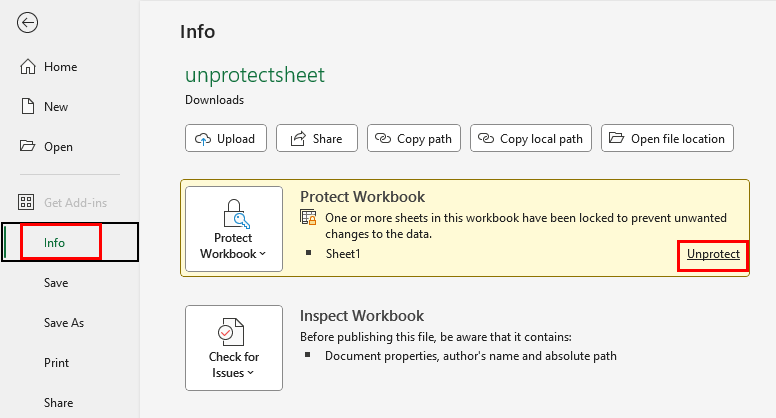
Open the Excel workbook on your PC or Mac.
Click on the File tab.
A left-side navigation panel shall open.
There, click on the Info menu.
On the right side, you should see a yellow button showing Protect Workbook.
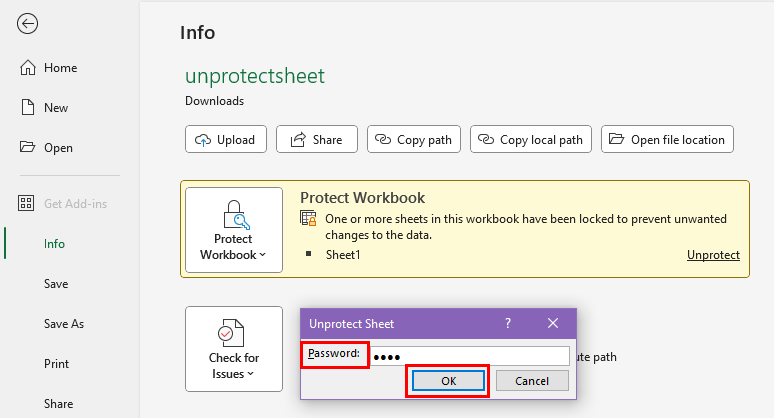
Click the Unprotect hyperlink in the button and enter the password that you’ve received via email.
The yellow Protect Workbook button shall now turn grey or according to the color of the Excel backstage interface.
That’s it! You’ve successfully unlocked the spreadsheet.
Using a Right-Click
If you can’t follow the steps mentioned earlier, no worries.
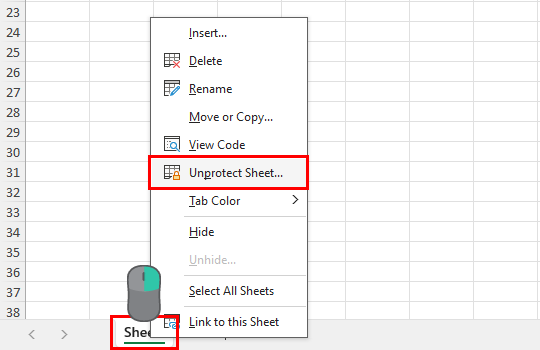
Go to the worksheet you want to unlock.
Right-click on the sheet name tab at the bottom of the worksheet interface.
On the context menu that opens, click on the Unprotect Sheet option.
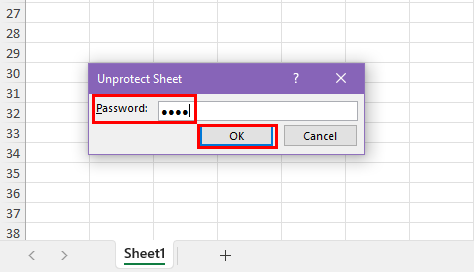
Enter the sheet protection password into the Unprotect Sheet dialog box and click OK.
From the Format Drop-Down
The Format tool of the Cells commands block in the Excel Home tab allows you to unlock a sheet with or without passwords. Saying without a password, I mean that the author didn’t enter any password when using the Protect Worksheet command.
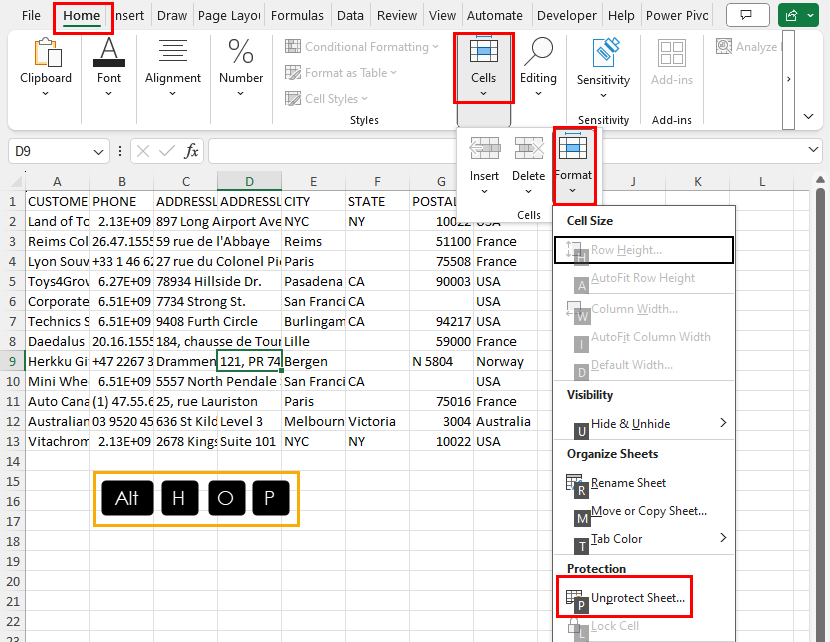
Access the locked sheet in the workbook and press Alt + H + O + P to unprotect the sheet in a single click.
If the worksheet is password protected, you’ll see the Unprotect Sheet dialog.
Using the Review Tab
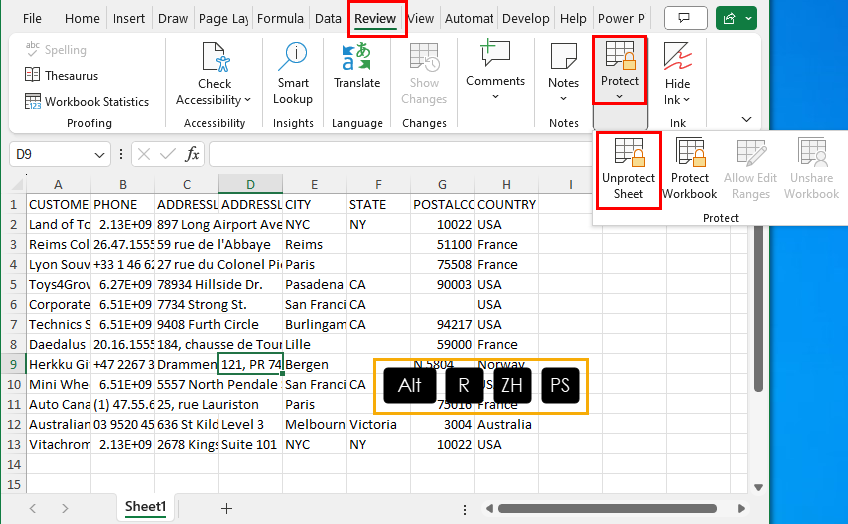
The primary location of the Unprotect Sheet command button is the Protect block in the Review tab.
You can press the keyboard shortcut Alt + R + ZH + PS to use the Unprotect Sheet command.
If there’s a password, you shall see the dialog box to enter the secret code. If there’s none, Excel shall unprotect the sheet instantly.
Unlock Excel Sheet at the Workbook Level
You can’t access a locked worksheet if the Excel workbook is password protected. If you’ve got the secret code to unlock the Excel file, follow any of the following methods to access the protected worksheets:
Using the Encrypt With Password Tool
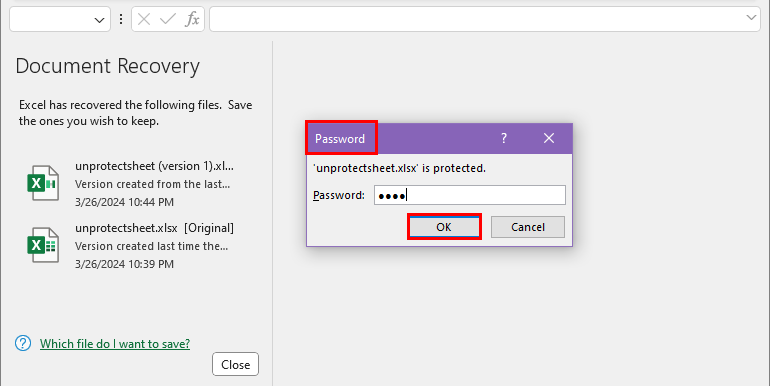
When you try to open the workbook, you’ll see the Password dialog.
There, enter the secret code shared by the author.
Now, you can access all the sheets of the workbook.
Follow any of the sheet-unlocking methods explained above to unprotect the spreadsheet.
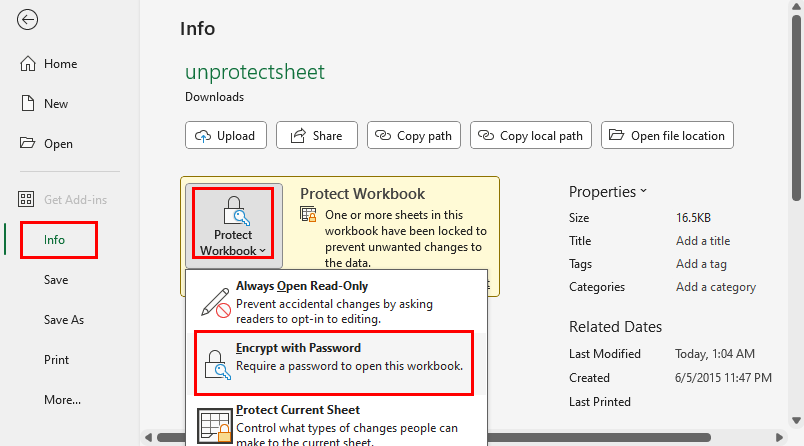
To remove the password protection, go to the Info menu from the File tab.
Click the Protect Workbook drop-down and click on the Encrypt with Password button.
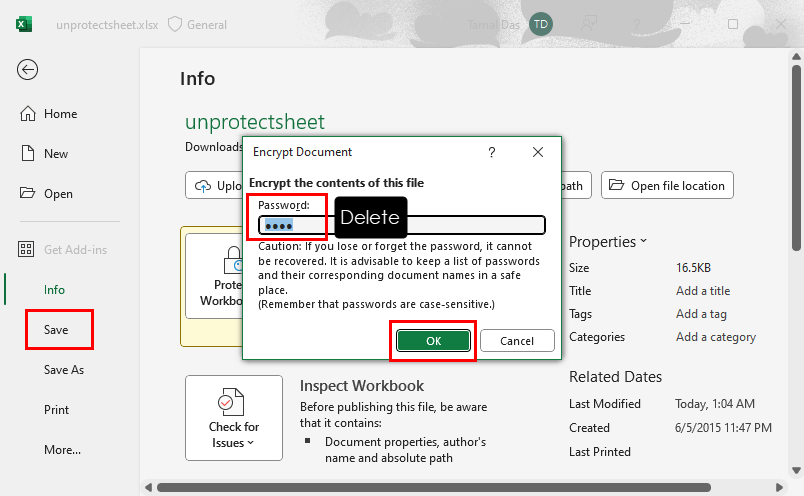
On the Encrypt Document dialog, delete the masked password and click OK.
Then, click the Save button on the left-side navigation panel to remove the password protection.
Using the Save As Dialog
This method is useful for removing read and write protection of an Excel workbook.
Open the protected workbook by following the above method using a password.
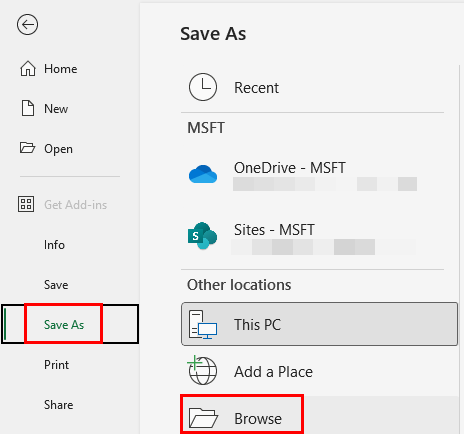
Now, click on the File tab and select the Save As option from the left-side navigation panel.
You’ll see the Save As menu on the right side.
Click on the Browse button to bring up the Save As dialog.
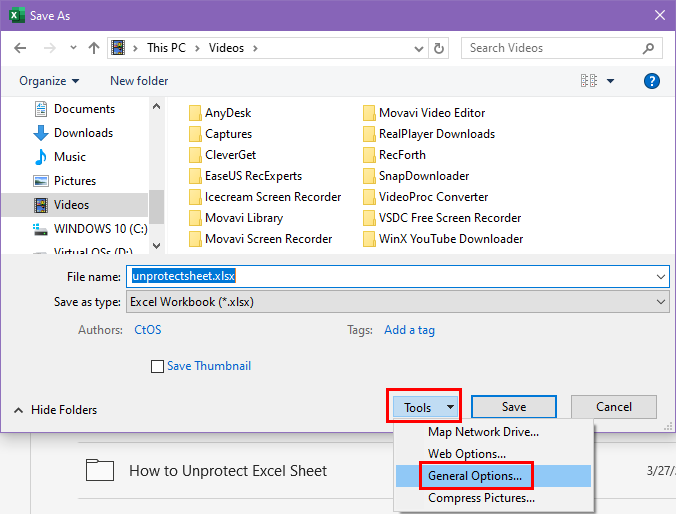
Click the Tools drop-down located at the bottom of the Save As box and hit the General Options button.
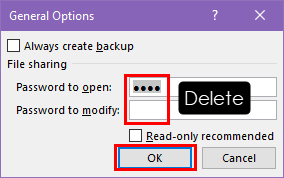
On the General Options drop-down, you’ll see the following options:
- Password to open
- Password to modify
Delete the passwords in the above fields and click OK.
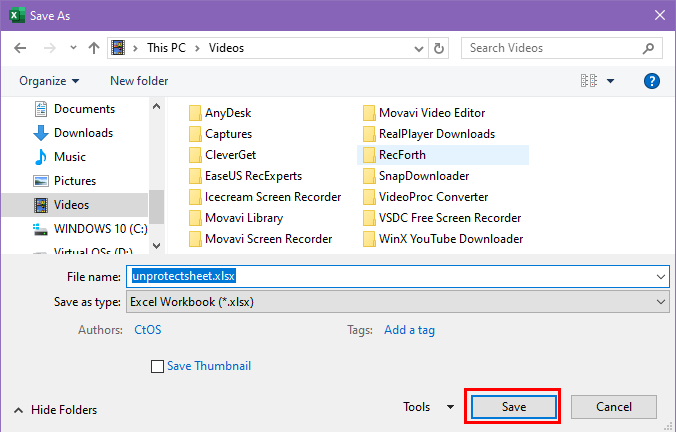
Now, click the Save button on the Save As dialog to remove the workbook protection.
Disable Access Restriction to Unprotect a Sheet
If you’re the author or Microsoft 365 domain administrator, you can disable the Access Restriction feature to unprotect a sheet. This feature lets you restrict selected people from your organization to open, read, or write workbooks and worksheets.
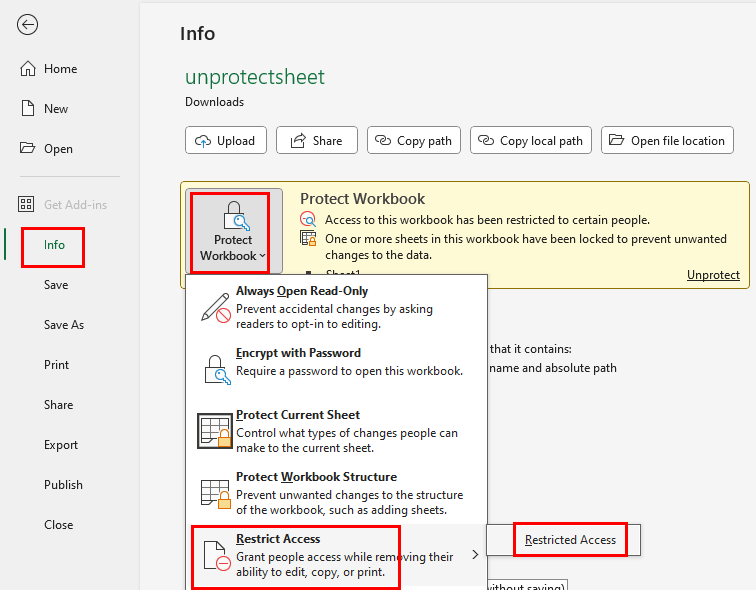
Click on the Protect Workbook menu in the Info tab of the Excel backstage view. You can arrive here by clicking the File tab from the worksheet view.
Hover the cursor over the Restrict Access option.
You’ll now see the Restricted Access option in the overflow menu. Click on that.
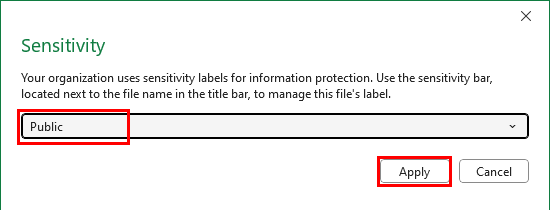
Click on the Sensitivity drop-down list on the next message box and switch it to Public.
Click Apply to unprotect the workbook as well as the worksheets in it.
So far, you’ve learned multiple techniques to unprotect a workbook or worksheet provided that you know the password.
Suppose, you’ve forgotten the password or you’d like to change a forgotten password for a worksheet or workbook.
In these events, you can try any of the methods explained below:
Unprotect Excel Sheet Using Google Drive
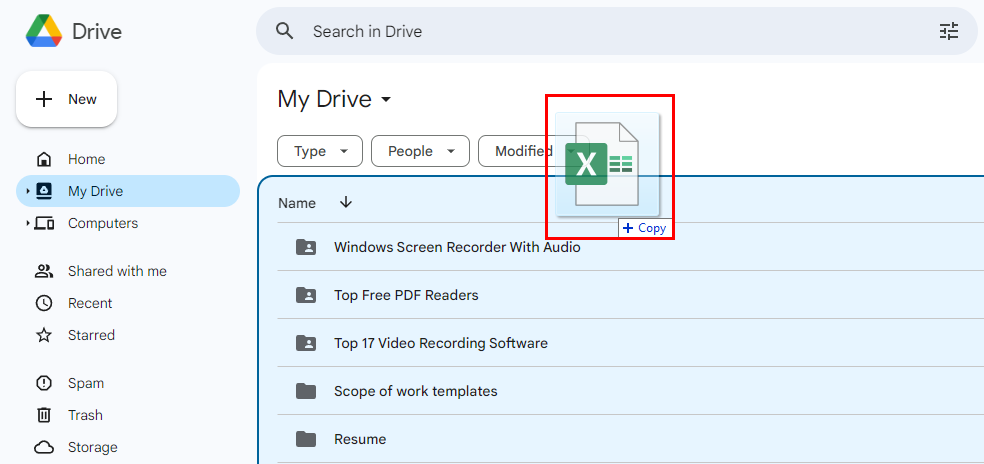
If you’ve got a Google Workspace free or paid account, go to Google Drive.
Now, go to My Drive from Home.
Drag and drop the workbook that contains a locked worksheet on My Drive.
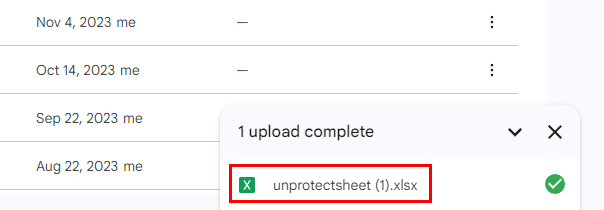
Click on the file name when the upload is complete.
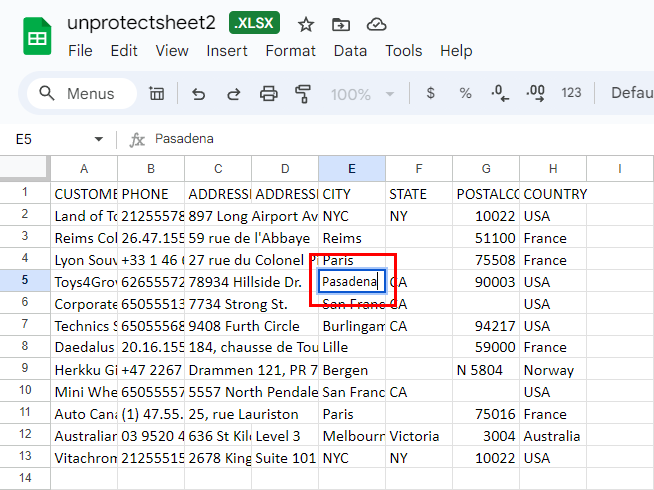
Google Sheets shall process the uploaded XLSX or XLS file and create a spreadsheet view for it.
You’ll see that you can now edit the worksheet.
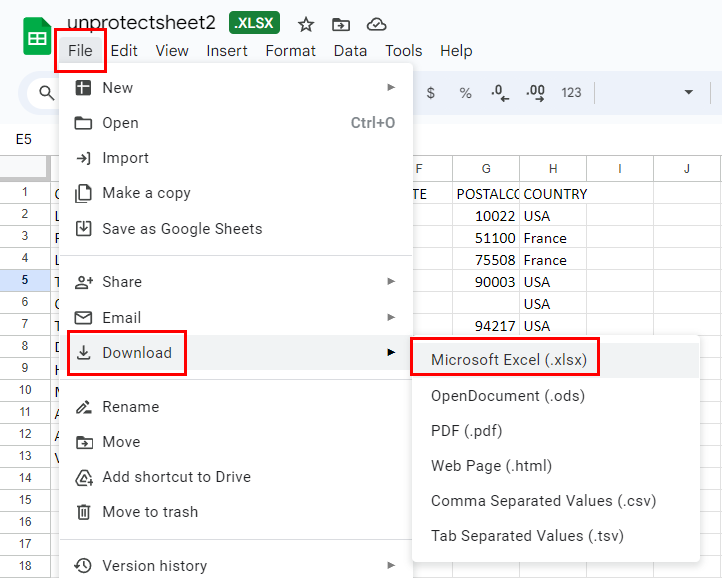
Click File on Google Sheets and choose the Microsoft Excel option in the Download menu.
Once the downloading is done, you get an unprotected copy of the previously locked worksheet.
When you open this XLSX file on your Excel desktop app, you’ll see the Protected View warning message. It should be below the Excel ribbon menu.
Click Enable Editing to start modifying your locked worksheet.
Unlock Excel Sheet Using an Online Tool
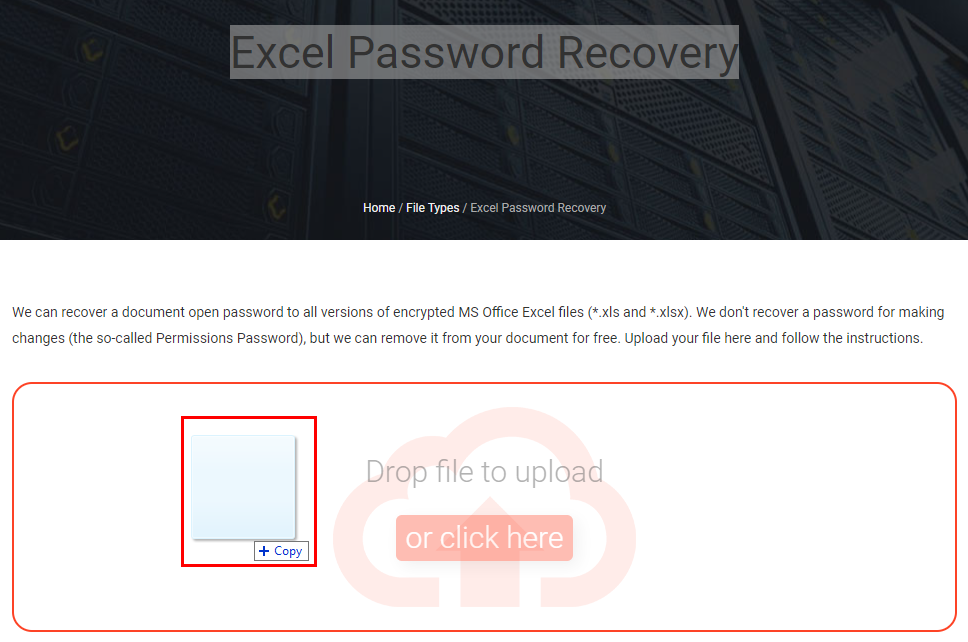
Go to the LostMyPass Excel Password Recovery portal.
Drag and drop the Excel file containing the locked worksheet. The maximum file size for the worksheet shouldn’t be more than 100 MB.
Once uploaded, the tool shall process the workbook to unlock the worksheet.
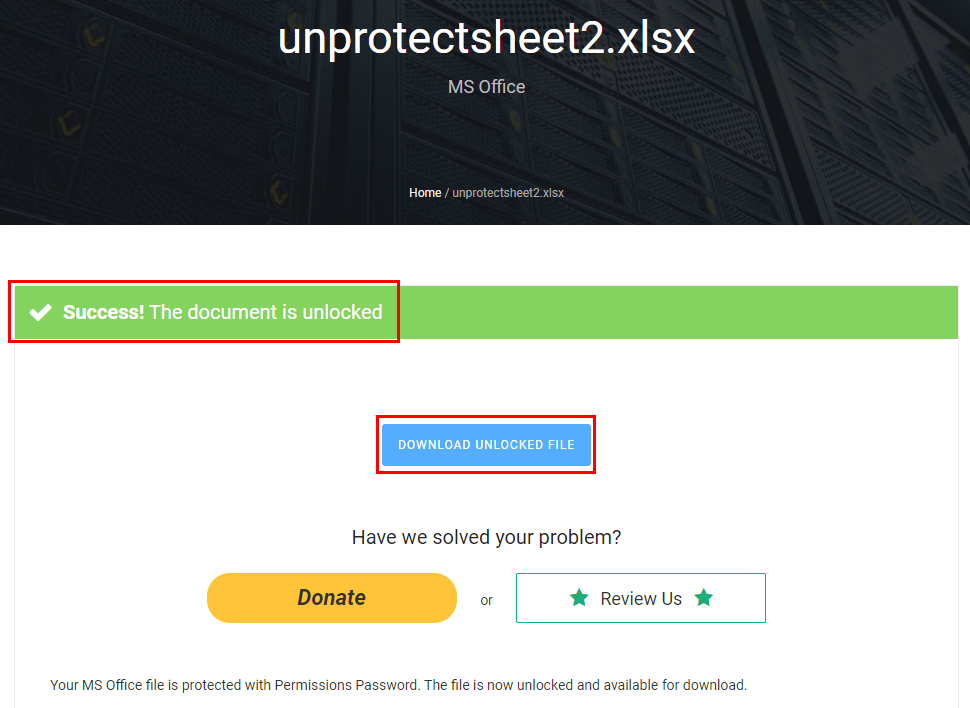
If the process is over, you’ll see the Download Unlocked File button. Click on it to download the Excel file.
Open the workbook in your Excel desktop app. Click the Enable Editing button to start editing the locked worksheet.
The remote connectivity between your device and LostMyPass is encrypted with HTTPS protocol. Therefore, it’ll be tough to intercept the data you’re sending to and receiving from the server.
However, you shouldn’t use this method to unprotect Excel worksheets if the workbook contains highly sensitive business data.
Unlock Excel Sheet Using Its XML File
Close the workbook containing the locked worksheet and create a backup copy of it.
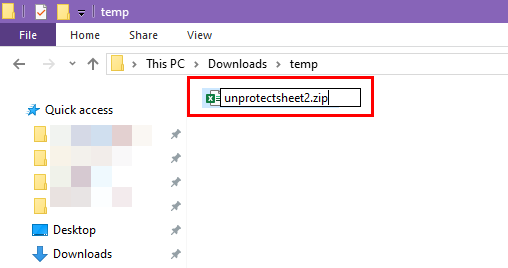
Now, rename the original Excel workbook to attach the ZIP extension to it.
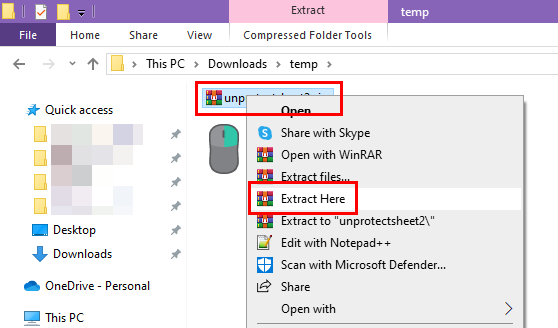
Right-click on the newly created ZIP file and choose the Extract Here option from the context menu. You’ll see this option if you’ve got WinRAR or 7-Zip on your PC.
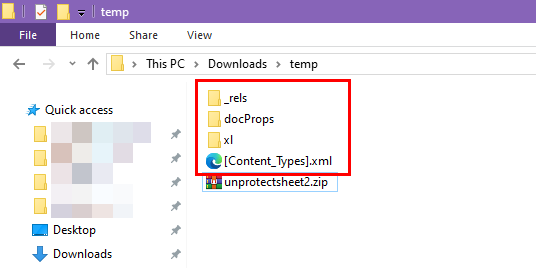
Now, you’ll find a few folders in the directory where you’ve extracted the ZIP file.
Go to the xl folder and then worksheets.
Inside the worksheets directory, you’ll find all the worksheets of the workbook. These are XML files.
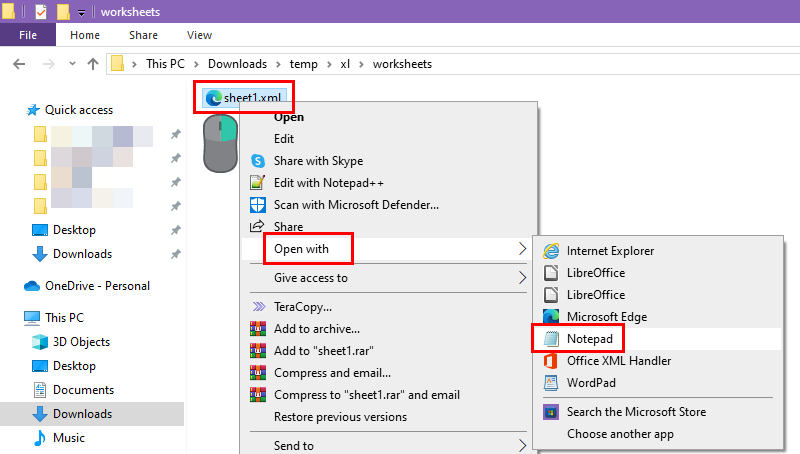
Right-click on an XML file and open the file in Notepad.
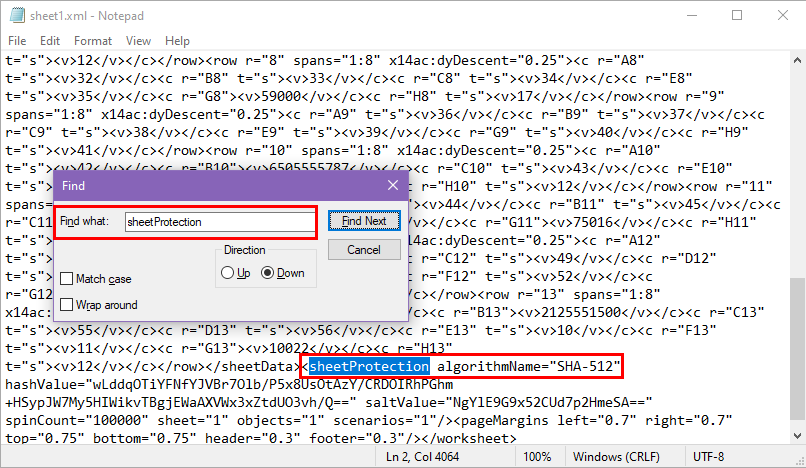
Search the file for sheetProtection. Select the entire code line within the < > symbols. The code line should be similar to the one shown below:
<sheetProtection algorithmName="SHA-512" hashValue="wLddqOTiYFNfYJVBr7Olb/P5x8UsOtAzY/CRDOIRhPGhm+HSypJW7My5HIWikvTBgjEWaAXVWx3xZtdUO3vh/Q==" saltValue="NgYlE9G9x52CUd7p2HmeSA==" spinCount="100000" sheet="1" objects="1" scenarios="1"/>Hit the Delete button.
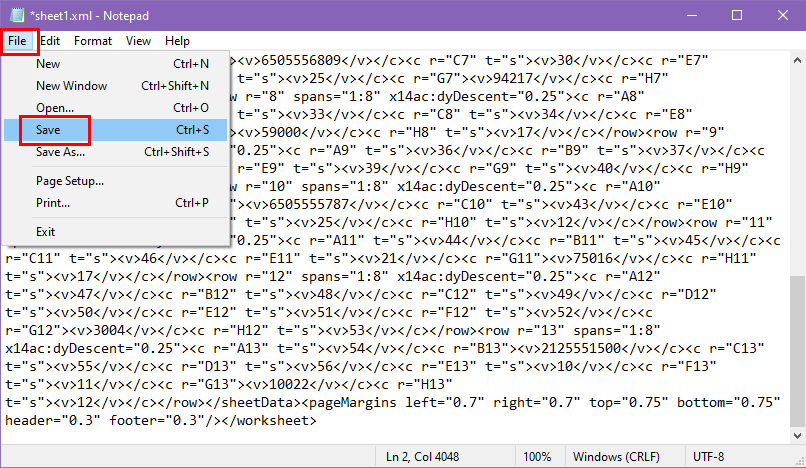
Save the Notepad file.
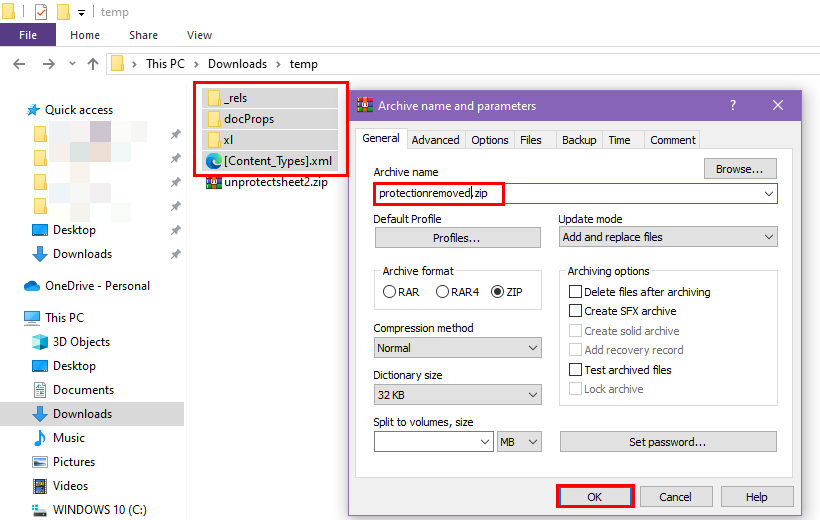
Now, highlight all three folders and [Content_Types] XML file. Compress it into one ZIP file.
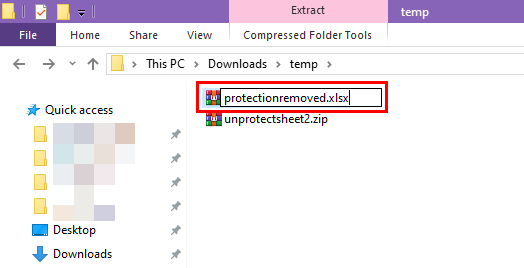
Rename the ZIP file to an XLSX file.
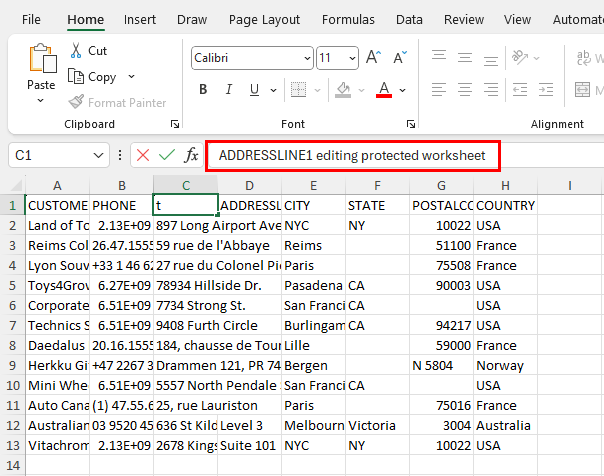
Now, open the Excel workbook and you should be able to edit the contents of the locked worksheet.
Unprotect Excel Sheet Using a VBA Script
If you know how to use VBA in Excel to automate tasks, you’ll also want to learn how to unlock Excel sheets using VBA.
Find below the script you can use:
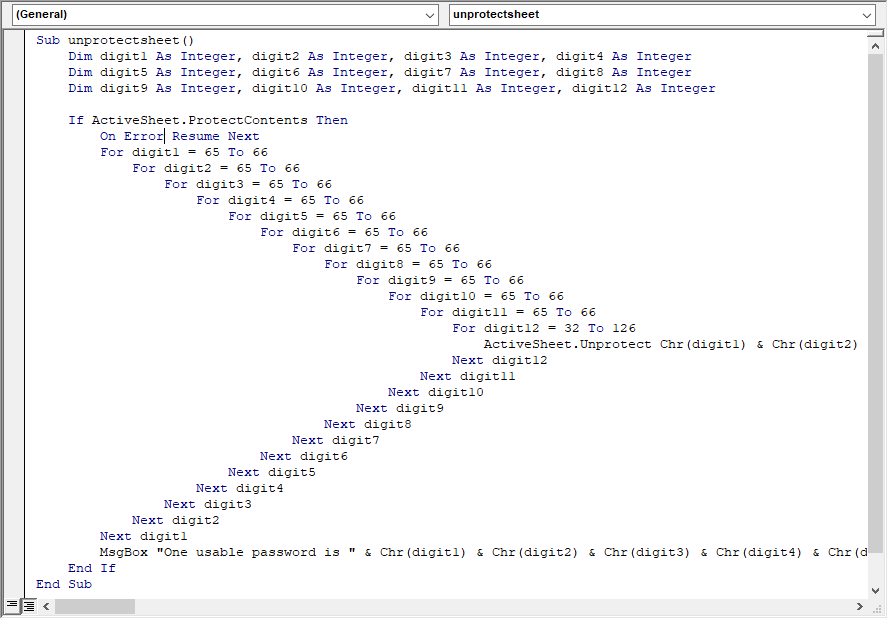
Sub unprotectsheet()
    Dim digit1 As Integer, digit2 As Integer, digit3 As Integer, digit4 As Integer
    Dim digit5 As Integer, digit6 As Integer, digit7 As Integer, digit8 As Integer
    Dim digit9 As Integer, digit10 As Integer, digit11 As Integer, digit12 As Integer

    If ActiveSheet.ProtectContents Then
        On Error Resume Next
        For digit1 = 65 To 66
            For digit2 = 65 To 66
                For digit3 = 65 To 66
                    For digit4 = 65 To 66
                        For digit5 = 65 To 66
                            For digit6 = 65 To 66
                                For digit7 = 65 To 66
                                    For digit8 = 65 To 66
                                        For digit9 = 65 To 66
                                            For digit10 = 65 To 66
                                                For digit11 = 65 To 66
                                                    For digit12 = 32 To 126
                                                        ActiveSheet.Unprotect Chr(digit1) & Chr(digit2) & Chr(digit3) & Chr(digit4) & Chr(digit5) & Chr(digit6) & Chr(digit7) & Chr(digit8) & Chr(digit9) & Chr(digit10) & Chr(digit11) & Chr(digit12)
                                                    Next digit12
                                                Next digit11
                                            Next digit10
                                        Next digit9
                                    Next digit8
                                Next digit7
                            Next digit6
                        Next digit5
                    Next digit4
                Next digit3
            Next digit2
        Next digit1
        MsgBox "One usable password is " & Chr(digit1) & Chr(digit2) & Chr(digit3) & Chr(digit4) & Chr(digit5) & Chr(digit6) & Chr(digit7) & Chr(digit8) & Chr(digit9) & Chr(digit10) & Chr(digit11) & Chr(digit12)
    End If
End Sub
Go through this Excel tutorial to learn the technique to use the above VBA script to develop a VBA macro:
📒 Read More: How To Use The VBA Code You Find Online
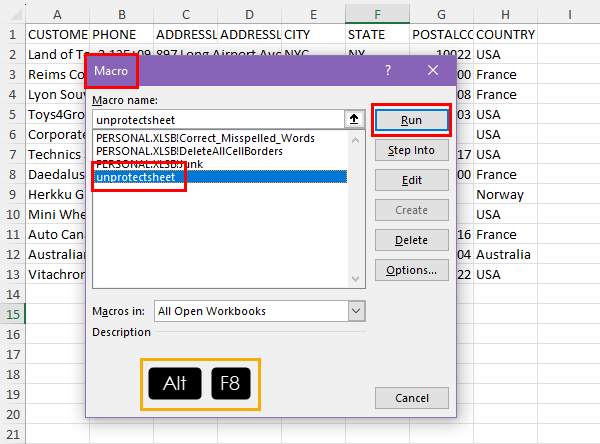
Once you’ve created the VBA macro, press Alt + F8 to bring up the Macro dialog. There, choose the unprotectsheet macro and hit the Run button.
The script might take hours to run to find the password of the protected worksheet.
Once done, you shall see a dialog box with a dummy password.
Simply click OK on the dialog box to complete the unlocking process of the locked spreadsheet.
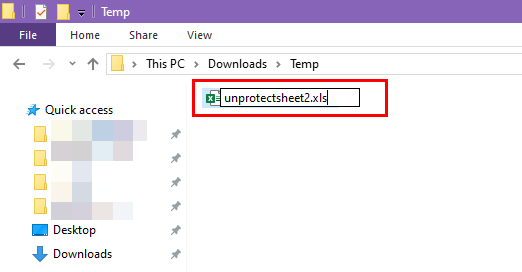
If the script doesn’t work, change its extension to XLS from XLSX.
Now, run the VBA script again, and this time Excel should be able to look up the password.
Unlock Excel Sheet Using a Workaround
Create a new Excel workbook on your device.
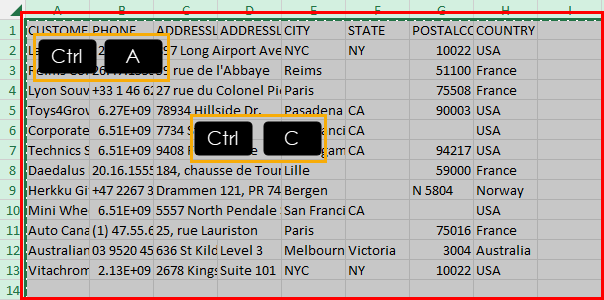
Now, navigate to the locked worksheet opened on another workbook. Click on any blank cell in the worksheet and press Ctrl + A to select everything.
Press Ctrl + C to copy the content.
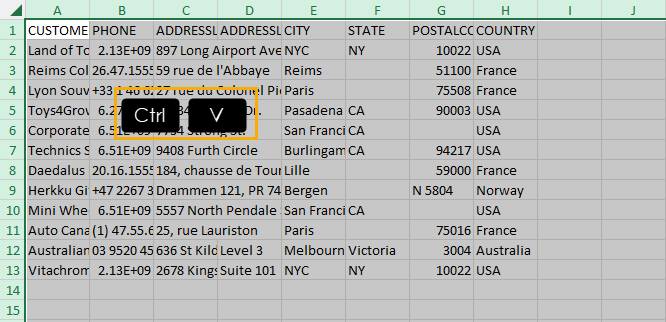
Go to your new workbook and paste the copied data into a sheet by pressing Ctrl + V.
This method only works if the workbook isn’t locked with a password and you’ve got read access to it.
Conclusions
These are all the tried and tested methods to unprotect an Excel sheet. It becomes easier to unlock and disable the protection of workbooks and worksheets if you know the password. For this, you should use the Unprotect Sheet feature.
However, if you can’t recall the password, you can use other methods like Google Drive, XML editing, VBA scripting, an online Excel file unlocker, etc.
Did you find the Excel tutorial helpful? Comment below. Also, if you know a better method that I might have missed, mention that in your comment.
 👉 Find out more about our Advanced Formulas course!


Thanks. It helped me a lot when I lost my excel password.